Monday, 5 December 2016

Gasification and carbon capture

In 2006, I became interested in gasification as a way of generating energy from biomass while storing atmospheric carbon in the ground. I thought I would explain some of the experiments I did and some of the interesting things I found out. 

What is gasification?

Gasification is the process of turning biomass, such as wood, into a fuel gas that an internal combustion engine can run on. Complete combustion of biomass produces water and carbon dioxide, but by restricting the amount of air allowed into the reactor you can produce an incompletely combusted gas made up of carbon monoxide, methane and hydrogen. This can then be piped into a normal spark ignition engine and used similarly to LPG. 

There are four steps in gasification: 
  1. Drying - The fuel is heated and water is removed from the biomass;
  2. Pyrolysis - The fuel heated without any oxygen breaks down and forms small volatile compounds (called tar or bio-oil) and solid charcoal;
  3. Combustion - The tar and charcoal are burnt in a small amount of oxygen from the air, generating heat for the entire process;
  4. Reduction - The amount of oxygen quickly runs out and the water and carbon dioxide are reacted on the hot charcoal surface to produce carbon monoxide and hydrogen.
Photo Credit: GEK

Some of the benefits of gasification, as opposed to combustion on an open fire, includes the increased fuel efficiency, as combustion is much more efficient and clean when using a gas instead of a solid fuel. The conversion of biomass to electricity using simple combustion requires steam turbines which are only economical on a large scale. The ability to power an engine that can drive a generator means it is also a low-cost method to generate small scale power. By adding the charcoal that is generated to the soil, the entire process can be carbon negative by trapping the CO2 the tree took in during its growth and locking it away in a stable form of carbon charcoal.

These types of gasifiers were heavily deployed (in over a million vehicles) in Europe during WWII when fossil fuels were in limited supply. My favourite photo from this time is a picture of a tank powered by a gasifier.

Photo credit

I built two different types of gasifiers - a gasifier stove and a downdraft gasifier, both of which I will outline below.

Gasifier stove


The first gasifier I built was a gasifier stove. The geometry of the gasifier is called a top-lit updraft gasifier (TLUD). This means the fuel is combusted from the top with the air moving up through the fuel. The diagram below shows the working principles. 

Photo credit
The fuel is lit from the top and air is supplied from the bottom. A flame front (migrating pyrolytic front) moves down through the fuel. The tar and water are pulled through the hot bed of coals, helping to break down some of the tar. Secondary air is then injected into the top of the reaction chamber which allows the fuel gas to burn cleanly. The stove was built from a computer supply box and used a forced draft from a computer fan which I powered on 12V DC. I mainly ran the stove on wood chips but I also used it to test the heat content of different fuels by heating water placed on top of the stove.


The stoves are not just a curiosity; thousands of them are being built and used in developing countries to improve the air quality for those who rely on solid fuels for cooking. The video below explains.


I also made use of the stove to study the combustion of algae during a summer research project working with Dr Rupert Craggs from National Institute of Water and Atmospheric Research (NIWA) in New Zealand. The algae were grown in open raceway ponds which used waste water to feed the algae.

Photo Credit: NIWA
I made use of a non-woven geotextile to dry the algae from the 98% water content down to 7-12 wt% which is suitable for combustion. The higher heating value for the algae was 23.06 MJ/kg compared with wood at 14-17 MJ/kg. The dried algae formed flakes which made for excellent fuel and allowed for combustion in the gasifier stove. One thing I didn't measure was the emissions, as the high nitrogen content would suggest a large amount of nitrous oxide could be generated. 


We published the results in a conference proceedings in 2010. https://www.waternz.org.nz/Article?Action=View&Article_id=786. In particular, we looked at the potential for algae to be carbonised to biochar to be a stable carbon sink.

Discovery model gasifier


The discovery model gasifier is a downdraft gasifier. This means the air is injected in the bottom and drawn down. The design of the gasifier is based on the Pacific class gasifier from a New Zealand company called Fluidyne. I scaled it down so that it could power a 660 cc engine at 1500 rpm outputting 3 kW of energy. This required a gas output of 9024 m3/hr of wood gas with a wood consumption of 4.19kg/hr. I initially had a 1kg hopper which allowed for a short test run of around 20 minutes. The design of the gasifier is really quite interesting and was designed to be built at a very low cost (a diagram of the gasifier is shown below). The fuel is loaded into the top and moves down as it is consumed. The fuel is dried and is broken down to tar and charcoal in the pyrolysis zone. Air is then injected through three nozzles and allows for combustion. A tube then comes up through the charcoal into the oxidation zone. Many gasifier designs make use of a metal throat that mechanically constricts the fuel. However, this throat can melt as the high temperatures are hot enough to melt steel. This gasifier makes use of the charcoal itself to act as the throat and the insulation allowing for low-cost materials to be used. As the carbon dioxide and water enter the tube the hot charcoal, in the absence of air, produces carbon monoxide and hydrogen.


The biggest advantage of a downdraft gasifier design is that all of the tar must go through the oxidation zone and then the reduction zone. This makes the fuel gas generated from these types of gasifiers very clean.

Here is picture inside the reactor with the constriction tube and the nozzles (the bolts are being stored there and are not used during operation). You can also see the diesel glow plug I used to start the gasifier in the top right corner.


The fuel I used was mainly wood chips or small wood rounds from the garden. The fuel gas then passed through a series of cleaning stages to prepare it for the engine. I used a blast tube to remove the large particles and some of the soot. A cyclone particle separator was made to remove the micron-sized soot particles. Cooling tubes were used to condense the water out of the gas and to generally reduce the temperature of the gas as well as to increase the density of the fuel gas. Finally, it went through a sawdust filter to remove any particles or tar that were missed in the previous stages. I later replaced the sawdust filter with a bag filter which could be cleaned and reused. 

The gasifier was designed for a large generator, which I didn't end up finishing, but I did some preliminary tests with a smaller generator. Here is an interview I did where I started up the gasifier and ran the engine.


I later increased the fuel hopper size using a propane tank and used fibreglass to insulate the fuel chamber so that fuel wouldn't get stuck in the hopper. Here is a video of the gasifier and the flare running using the air blower, showing a relatively clean flame.


One of the important aspects of making the gasifier work well (i.e. tar free) was to adjust the height of the reduction tube so that it was inside the oxidation zone and the grate height to allow the fuel to flow. Two good checks for a tar free operation was a blue flame (meaning no hydrocarbons in the fuel) and no hydrocarbons in the condensate from the fuel gas cooler. As you can see from the picture above I got close to correctly tuning the gasifier however Fluidyne's Andes class gasifier flaring shows a really excellently tuned gasifier with only carbon monoxide and hydrogen burning.

Fluidyne
The microlab gasifier was built by Fluidyne in 2011 and is the same size as the discovery model gasifier but with two cyclones and is now being used for research at the University of Ulster.

Microlab gasifier
I have Doug Williams from Fluidyne to thank for showing me how to build and operate gasifiers. I also have to thank Peter Wilkinson from Wilkinson Transport Engineers, who allowed me to use his workshop and materials to build the gasifier. 

Continued interest

My PhD research is on combustion, global warming and reducing soot emissions from engines so this still interests me greatly.  Gasification of biomass is one of the key technologies for controlling the amount of carbon dioxide in the atmosphere. This is often referred to as bioenergy, with carbon capture and storage (BECCS). CO2 is captured by trees and the CO2 released during burning can be stored, making the process carbon negative.

Photo Credit: Drax Power
A second option is to burn some of the carbon to CO2 and to store the rest of the carbon as solid charcoal. This is called bioenergy-biochar systems (BEBCS). This does not sequester all of the carbon but as the charcoal is easier to handle and when added to the soil (referred to as biochar) can improve the holding of nutrients. This process is cheaper as the biochar can be sold to offset the cost.
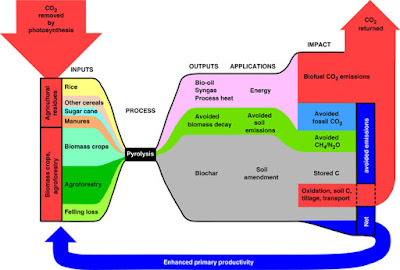
Photo credit


I will probably be writing more about biochar in the future, but feel free to ask any questions about gasifiers.

Tuesday, 13 September 2016

Molecular tennis: Can nascent soot burn from the inside?

After arriving at the lab in Februrary I started working with Peter Grančič on collision studies of gas molecules with clusters of flat carbon molecules which resemble the very early soot particles (nascent soot) found in flames. So here is the paper.

I prepared some slides to explain the research.

Monday, 1 August 2016

Starting a PhD in Cambridge

In Februrary this year I began my PhD and so I thought I would write about how it has gone so far. Before arriving I contacted a professor in the Chemical Engineering department who leads a group that studies the formation of soot in engines and the flame synthesis of nanoparticles. It took about a year to organise funding and VISAs for my wife and I. This was by far the most challenging aspect and required applying for every scholarship under the sun. Funding eventually came through the Singaporean government who are interested in reducing carbon emissions from industry. With funding arranged we could apply for study. Cambridge University has many colleges which provide accommodation, catering and tutoring. We joined Churchill College, a newer college to the west of the main city centre.


Churchill College has flats for couples and families which are very comfortable. Packing everything into five suitcases was very challenging but soon enough we were ready to board the plane. Two 10-hour flights were needed to transport us literally to the other side of the world. 


Arriving in Cambridge felt as if we were transported back in time. The colleges have some amazing buildings and grounds. Behind the colleges runs the river Cam and hiring a punt gives you one of the best views of the colleges.


The many different departments are scattered around the city. The Department of Chemical Engineering and Biotechnology, where I am currently base, is hidden behind the old Cavendish laboratories site (the labs have moved out to west Cambridge).


Here I began to research soot formation in the computational modelling group, which works predominately in the field of combustion. 

One great thing about starting in the group was how welcoming everyone was. The group has members from all around the world; South Africa, Bulgaria, China, Poland, Austria, England, Scotland, Germany and now New Zealand. The pace is also very fast, there is a lot more focus on individual projects, perhaps less collaboration than I was expecting. There is also more self-direction than I am used to which is a good thing but also requires careful time management. Coming into the field of combustion I was surprised how little we understand about formation of soot and am excited to work on the topic. I have begun to simulate the self-assembly of molecules into soot particles making use of the cluster of computers we have in the group and the university's supercomputer.

Everyone works long hours but there are good breaks. At 10:30 and 3:30 we have a tea break and everyone is served tea by the catering staff; it's a good time to catch up with the other students and professors. For lunch we head to the market to buy bread and cheese and eat in the park or outside King's College chapel.

We joined the community at Holy Trinity church and have enjoyed the band, teaching and post-church drinks at the pub. I was surprised that Cambridge has the highest church attendance out of any place in England. There is also not the same conflict model between science and faith that I am used to with regular lectures at the Faraday Institute about Christianity and science. We have a friend doing a PhD on the implications of evolution on Christianity theology and philosophy. The main critiques of the church that we hear are historical in nature, such as the subjugation of woman (not as historical as I would like) and killing in the name of God.

Being so close to Europe has meant being able to travel on cheap flights to Sweden, France and England. We have also been able to help out in Calais at the refugee camp. England is much closer to the action and it has been interesting to hear the different opinions around Brexit and frustrations surrounding the government and the European Union. 
What I miss the most about NZ is family, fresh food and the beaches. But I now know why people travel all this way to live in Cambridge, the people really make Cambridge what it is.

Tuesday, 12 July 2016

DIY fluorometer for detecting oil pollution in water


The citizen scientist community, which in the United States has its roots in the gulf oil crisis, has been interested in measuring the amount of oil in water to track pollution like oil spills. One test kit that has been developed by the organisation Public Lab uses a laser and a webcam spectrometer to measure the fluorescence of different oils in order to identify the type of oil (https://publiclab.org/wiki/oil-testing-kit).
Link 
This is useful for identifying different types of oils but quantifying the amount of oil in a sample is also needed to track its spread and quantify the degree of pollution. However, detecting oil in water is difficult as the two separate. The standard method in the lab is to use a solvent (tetrachloroethylene ASTM D7066-4) to extract the oil from the water. Once extracted, either fluorescence (where the oil is illuminated with UV light and glows green/red) or infrared absorption of the C-H bond can be used to measure the amount of oil in the sample.


Figure 1 - Infrared transmission spectra of solvent without (left) and with (right) oil added. The band at 3000 cm-1 corresponds to vibrations in the C-H bonds which the solvent doesn't have and is used to quantify the amount of oil in the sample. (source: patent US4164653-2)

Figure 2 - Fluorescence spectrum from different oils excited with UV light (308 nm). (source)

The problem with these methods is that the equipment needed to perform the measurement costs a considerable amount, 500-1000 USD for a second-hand Fourier transform infrared spectrometer or a second-hand fluorometer on Ebay. I had done some work on making low-cost colourimeters using LEDs before and so I thought building my own fluorometer would be a good place to start.

I started by taking my multimeter colourimeter and measuring the voltage of a green LED, using it as a photodiode. There was a signal for highly fluorescent compounds such as vitamin B12, but it was very weak and would not be sensitive to small amounts of oil. One option was to construct an amplifier circuit, however this incurs a high assembly cost. I stumbled across this instructable on how to construct a very sensitive light sensor from a TSL237 light to frequency converter, which has a photodiode along with a built-in amplifier and voltage to frequency converter: (http://www.instructables.com/id/Highly-sensitive-Arduino-light-sensor/). This light sensor is very sensitive but what is more helpful is the conversion of the light intensity into frequency - a microcontroller like the Arduino is much better at measuring a frequency than a voltage. This means you can plug the sensor directly into an Arduino and take very accurate readings by converting the frequency to an illuminance value. The sensor only costs about 3.33 USD and is probably the most accurate sensor you can buy for that price.

After finding an accurate sensor, the other problem is the use of solvents. These are hard to source, require fume cupboards and are not safe for use at home. I found a solvent-free method online to extract oil from water, from the company Turner Designs, which makes fluorometers. The procedure consists of adding a solution to the oil and water mixture, heating it until it became cloudy and then cooling it down until it became clear and the oil is dispersed throughout. Certain detergents will drop out of solution when their temperature is raised. This only works for detergents that are not charged; heating an uncharged detergent interrupts the detergent-water interactions and causes them to no longer be soluble in water, the opposite of what you would expect. We had some Triton X-100 in the lab which is a non-ionic surfactant (detergent) with a cloud point of ~65 degrees C. Triton X-100 is safe to use and very cheap to buy. I prepared a 0.1% solution of Triton X-100 and added a small amount of olive oil, which has a good light emission at the wavelength where crude oil emits light. As such, this oil could be used as a standard for crude oil measurements.

Figure 3 - Drops of olive oil floating on 0.1% Triton X-100 in water (left). Heating above the cloud point (70 degrees) (right) it becomes opaque; upon cooling it becomes completely clear.

I bought some TSL237 light-to-frequency converters from RS and used some Veraboard to solder one to some wires to attach to the Arduino. I also attached a 405 nm LED with a resistor (220 Ohms) between 0 and 5V of the Arduino. I used four layers of green cellophane which allow through ~500 nm, the peak of the emission, and block out the UV light from the LED. I found that four layers were necessary to block the UV LED to the point where it was not picked up and without any sample added the reading was the same whether the LED was on or off.
Figure 4 - Veraboard circuit which connected the light sensor and LED to wires, which plugged into the Arduino. It is attached to a laser cut colourimeter, and to my laptop.

I made use of the great Freqperiod library to measure the frequency, a software library for Arduino that is designed to measure frequencies below 20 kHz. It measures frequency in Hertz to six decimal places. There are other libraries to measure above 20kHz that means that by changing the software you can measure a huge dynamic range of light intensities. (http://interface.khm.de/index.php/lab/interfaces-advanced/frequency-measurement-library/) Most of the readings were in the hundreds of Hz. Full room lights were 20kHz while the maximum reading the sensor can do is 1000kHz (see Figure 5).
Figure 5 - Frequency vs. light irradiance (left) and response curve (right) taken from the datasheet for the TSL237 light-to-frequency converter. 

Below are the readings for different samples. The filter attenuated a lot of the light. The next improvement is to buy a better filter. In fluorescence measurements large lenses are often used to collect as much light as possible. So integrating a lens could also help, however all of these additions increase the cost of the unit. 

SampleFrequency (Hz)
Water42.9±0.2
Triton X-10045.0±0.2
100 ppm olive oil55.1±0.2
1000 ppm olive oil62.3±0.2
Pure olive oil5985
Room lights20,000


Figure 5 - Olive oil excited with 405 nm LED emitting red light. The decay of the red emission into the olive oil indicates it is saturating and absorbing all of the light before it can reach the other side of the cuvette. This leads to incorrect readings; for an accurate reading the olive oil would need to be diluted. 

Measuring the stability of the reading over time gives a fairly narrow band of frequencies with a deviation of only ~0.2 Hz. The readings are stable enough to compare samples ranging from 100 - 1000 ppm. With a better filter, there is potential to detect samples of under 100 ppm. 
Figure 6 - Measurement over a few minutes (inset top) with the histogram of frequency readings (top) and fitting to a normal distribution (perhaps log-normal would've been better) giving a width of 0.2 Hz.

The next step is to integrate it into an Arduino shield. The cost of something like this would come down to the price of the Arduino but because you only really need one pin to measure the frequency you could use something like the Adafruit trinket (6.95 USD) and make the whole thing for under $20. Any interest in helping to do this would be greatly appreciated as I have left all of my soldering supplies in New Zealand (I now live in Cambridge, UK). 

Figure 7 - Diagram of a shield for an Arduino Micro, with an added RGB LED for optical absorption measurements on the same device. In order to take a reading, a box would be needed to put over the device, or a 3D printed holder for the cuvette could be designed.

Another interesting application is in water testing. Turbidity is an important measure of water health and my biology friends tell me it is very important as fish can't see their prey if the water is cloudy. This accurate light sensor could be used to measure turbidity. A student and I have also been working on using milk as a standard for preparing turbidity standards to calibrate the measurement. Anyway, there is more to come on this. If anyone is interested in helping out or if you have any questions, please let me know in the comments. 

Thursday, 16 June 2016

Detecting 70 molecules in a billion by converting a blu-ray disc into a chemical sensor

At the Photon Factory (the lab I used to work at) Dr Michel Neuwoudt our expert Raman spectroscopist had been hard at work detecting contaminants in milk using a technique called Raman spectroscopy which she has recently published (doi:10.3168/jds.2015-10342). Prof. David Williams, Dr Cather Simpson and Michel started this project after the melamine scandal in China where melamine was put into baby milk formula to make it appear as if the protein content of the milk was higher than it was. This fooled people because the test for protein naively digests everything in the product and measures the nitrogen content of the mixture. Melamine has a huge number of nitrogen molecules so it appeared as if the milk had more protein than it did. I had been playing around with using Blu-ray discs colour sensors. We thought about whether the nanostructures on the Blu-ray disc could be able to enhance the weak singles you measure using Raman spectroscopy and so along with other in the lab Reece, Nina, Andy (Xindi) and Jenny Malström we started the project.
Molecule of melamine showing large number of nitrogens Link

The paper we recently published first as a conference article and then as a journal article in Analytical and Bioanalytical Chemistry converts a Blu-ray disc into a sensor that can detect accurately and reproducibly down to 70 parts per billion of melamine.

Front cover of journal showing the gold nanoparticles on top of the Blu-ray disc. You can also see the pattern of the nanostructure of the Blu-ray grating the gold was deposited on.

The technique we used is called Raman spectroscopy which measures the vibration of molecules using a laser (see this video for more details). This effect is very weak and so cannot be used for low concentrations of molecules. To enhance the signal and amplify it we use a surface which has small antennas that are tuned to the light we are using. The electrons on the surface of these metal nanoparticles start to oscillate with the electric field of light and so you get regions on the metal where the electric field is much higher.

Plasmon resonance as the electrons move in the electric field of light which is an electromagnetic wave Link

The effect is not linear so when you double the intensity you actually get out four times the amount of signal. As the nanoantenna produces very intense hot spots near the particles you can enhance the signal by >1000000000 times. Two things are then needed to make surface enhanced Raman spectroscopy work; the molecules need to be able to adsorb onto the particle so they are in the high electric field and the surface of the nanoparticle must be the right size to resonate with the light. Actually, it is not that hard to prepare SERS substrates that meets these criteria and gives large enhancements but they are notoriously unreproducible this is a huge problem for the field as analytical measurement demands that you can measure things accurately. It turns out preparing reproducible nanoparticles of gold on the nanometre scale is really challenging and is why commerical single use SERS substrates usually retail for about $NZD100 each.

We managed to produce a SERS substrate that is cheap and easy to make and most importantly gave reproducible results. We did this by using a sputter coater to deposit nanogold onto a Blu-ray disc. Sputter coaters are used in almost every lab where there is microfabrication and it deposits metal using a plasma. They are relatively cheap to buy I have seen a few on eBay. There is a nice video about how to make your own sputter coater. The amount of gold is actually quite small so it would only be a few dollars of gold on each sample. Most  You could deposit a SERS substrate on any non-conductive material however the trick for making a reproducible SERS substrate is that the Blu-ray disc provides a very uniform clean sample. The Blu-ray disc is made up of layers of plastic and metal with the grating hot embossed into the larger plastic disc.

Diagram of layers found in Blu-ray disc with the hard coat the polymer being easily peeled off to reveal the grating.

By peeling off the plastic top coat with tweezers you reveal a perfect surface for depositing the gold.

Using tweezers the top plastic coat can be removed to reveal the grating.

In order to tune the nanoparticles to the wavelength of light we used (785 nm) we changed the sputtering time. This produced smaller nanoparticles and led to the substrate resonating at the right wavelength. Putting a drop of melamine doped water and measuring the spectrum using a Raman microscope we were able to measure down to 68 molecules out of a billion water molecules. The amounts deemed to be dangerous by the world health organisation are 1 ppm in infant formula so we are well under the limit of detection.


Above the Raman spectrum of melamine at different concentrations. Below the melamine vibration we are measuring is the ring breathing mode. Link to animation 
The measurement was also very reproducible with only 12% variations which is very low when considering other SERS substrates with you can have over 100% variations between areas of the same sample. 

The Raman spectrometer we used was quite a large unit (table top) but there are now smaller handheld Raman spectrometers and these will only be getting cheaper. We think the applications for a low cost testing kit could be developed making use of a portable Raman spectrometer.

Portable Raman spectometer Link
An interesting application we would like to explore is using these low-cost SERS substrates to identify different bacterial strains in a hospital setting. Below is a presentation I gave on this at Advanced Materials and Nanotechnology conference in Auckland.